Thursday, October 9, 2014

Crock-pot Turkey Recipe to Die For

Last night I had a few extra boys for dinner.  I wanted to make something warm and inviting and have the hole house smell good.  Kinda like it does on Thanksgiving Day!  I had a busy day planned and knew I didn't have time to make a REAL Thanksgiving meal so I decided to bring out the crock-pot and make my life easier.  I went to the store in search of turkey thighs but only could get turkey legs...So legs it was.  This meal is always a hit (using either legs or thighs) and making the gravy out of the cooking sauce, which is a combination of lingonberries and cranberries, which is a nice mix of sweet and sour meets gravy.  Hope you all enjoy this one as much as I do! Enjoy!
Crock-pot Turkey Legs with Rosemary, Cranberries and Lingonberries
6 Turkey legs
2 cans organic whole canned cranberries (Not jellied)
1/2 jar of Lingonberries
1 yellow onion quartered
3 pieces of fresh rosemary
Here it is in the crock-pot
Place all ingredients in a crock-pot and put on low for 8 hours.  Take liquid out of crock-pot and make a gravy using either flour or corn starch.  I used flour because none of the boys had a wheat allergy.  Then serve with mashed potatoes and whatever vegetable you would like.
Note: You can use turkey breasts or thighs with this recipe...I could only find legs at the store this particular day.  Enjoy! 


Tuesday, October 7, 2014

Party Planning...Classy Surpise 50th Dessert Birthday Party!

I get hired for many different things and it seems I wear many different hats!  An event I did recently was a 50th Birthday Party.  It was a ton of fun for me especially because the women that hired me was great to work with.  She definitely knew what she wanted it to look like.  So, I presented a few ideas and we ended up making the perfect Classy 50th Dessert Birthday Party.
The Birthday Girl I was doing the party for I didn't know very well.  So I started by asking the hostess a little about her.  I found out that the birthday girl was very religious, family oriented, she had children and they meant the world to her.  I also found out that she wouldn't take well to a party that made fun of her age.  She was more shy and really didn't even want to celebrate this milestone at all.  So, this was a challenge...but I love a challenge!  I came up with the idea of a Classy Birthday Party, full of family photos along with classy desserts and flower arrangements that didn't have any BLACK flowers or any reference to "Over the Hill"!  Below are some photo's that were really hard to take because the house was lit by candles and the lighting was really dim...but, you get the idea.


Every dessert I made I had made these little flags that said something about who the women was (Her Character)!
  These were some of the words the hostess came up with when I asked about the Birthday Girls Character!  I thought this was great!  She was Wise, Faithful, Elegant, Gracious, Nice, Sincere, Generous, Humble, Sensible, Happy and the list went on!  I tied little spoons in a silver ribbon to each individual chocolate souffle...They really were cute.
Here were the containers before I filled them with the yummy dessert:)
I also made these cute little Greek Yogurts with berries and a touch of honey.  I then typed up a sign and called them "Generous" to go with the theme of the Birthday Girl!


Main table!
     As the Center piece on the table I simply took large glass containers and filled them with individually wrapped mints that were in the the theme colors the Hostess picked (White, Black and Silver).  Also, 50 Silver balloons hung over the table each had a family photo that dangled from the balloon.  This was very cute and a great conversation piece.


The Birthday Girl's favorite dessert was Red Velvet Cupcakes so WE HAD to have those!

I also made little flower arrangements and had them placed around the room with candles throughout!


As you can see plenty of desserts that graced the main table!  It was very elegant, and classy just like the Birthday Girl!  What a beautiful way to turn 50!  She clearly is loved by her friends and I really enjoyed meeting such beautiful women both inside and out!  Thanks for allowing me to help create a memorable 50th Birthday Party!


Saturday, October 4, 2014

The Project that never ends...Window Sills

So what are you working on this weekend?  I've been working on window sills all summer including this weekend!  I've been scraping, scraping, sanding, sanding, priming and painting...the never ending project.  It's truly the worst project I can think of.  I'd rather rip out the tile in the bathroom than do this.  It's not like it's a project that you can show off after your done.  It's extremely boring and unrewarding, but it is something that needs to be done at times.  What I find funny about this project is I asked neighbor boys to help out and I would pay them.  The boys lasted all of one hour and they never came back.  Well, I have to say, it's not a glamorous job, very time consuming and no one is lining up at the door to help me out.  The good news is, once I get them done it should prolong the life of the windows and save me money in the long run...I guess I'll see.  As you can tell I have lost all sense of humor while doing this, but I'm enjoying talking a break and blogging about the boring project.  Oh yea... REAL life can be boring at times:)  Have a great weekend!

 So here I started scraping and scraping.  Depending on how bad the windows sills are (lack of maintenance) will determine how much scraping is needed. You might need to dig out all the dry rot to reach the new wood and then fill it in with epoxies and fill in the void.  Thank goodness I'm getting to this before it became a crazy difficult job.  At this stage I'm scraping and sanding.  Then I use a paint-able caulk if I have a gap between the window sill and the stucco (In this case).  Then I let that dry and prime then paint.  This process can take days because I need the weather to cooperate with me and not rain.  This explains why these projects drag out.  Oh well, I'll feel good when they are done.  
Scraping and Scraping

Even more scraping

What I want to accomplish is a smooth surface before I fill in and prime.
Primed

All finished

Another set all finished...woohoo!

Thursday, October 2, 2014

Easy Sauteed Vegetables with Chicken...Products I LOVE

Everyone likes easy meals for nights that are consumed by kid sports...RIGHT?  This is when I start looking for food that's NOT full of preservatives, gluten free and can add flavor to my standby..."SAUTEED CHICKEN".   I always saute boneless chicken breasts on Sunday's and keep in the fridge to grab for quick meals.  Tonight, I added all "O" blood type vegetables that are on my highly beneficial list and made this in less than 10 minutes.  This is why I always keep an eye for interesting new products that come out.   This product is called Maya Kaimal Butter Masala, in Mild!  They have 5 different choices but I usually stick with mild because the kids become a little too picky when I try spicy things.
Easy Sauteed Vegetables with Chicken
2 tablespoons Olive oil
1 cup cut up celery
1 onion,cut in chunks
3 cloves garlic, sliced
1 yellow pepper, cut into chucks
1 red pepper, cut into chunks
1 1/2 cups broccoli, stemmed  
3 boneless chicken breasts, cut into chucks and sauteed
1 tablespoon fresh parsley
1/2 container of Butter Masala (Of your choice, pictured below)
1/2 cup water
Salt and Pepper to Taste
Serves 4

Saute vegetables in 2 tablespoons olive oil, add the cooked diced chicken and 1/2 container of Butter Masala and water.  Saute until sauce cooks down to half and a little thickened.  Add salt and pepper and sprinkle with parsley if you ave it! Perfect, quick and easy dinner for an O Blood type.  This would be a great meal for other blood types as well if you change out the meat and vegetables to suit your blood type.  Enjoy...it's REALLY yummy.
Product I LOVE

Gluten Free Ingredients and one container can last for 2 meals for a family of 4.


Wednesday, October 1, 2014

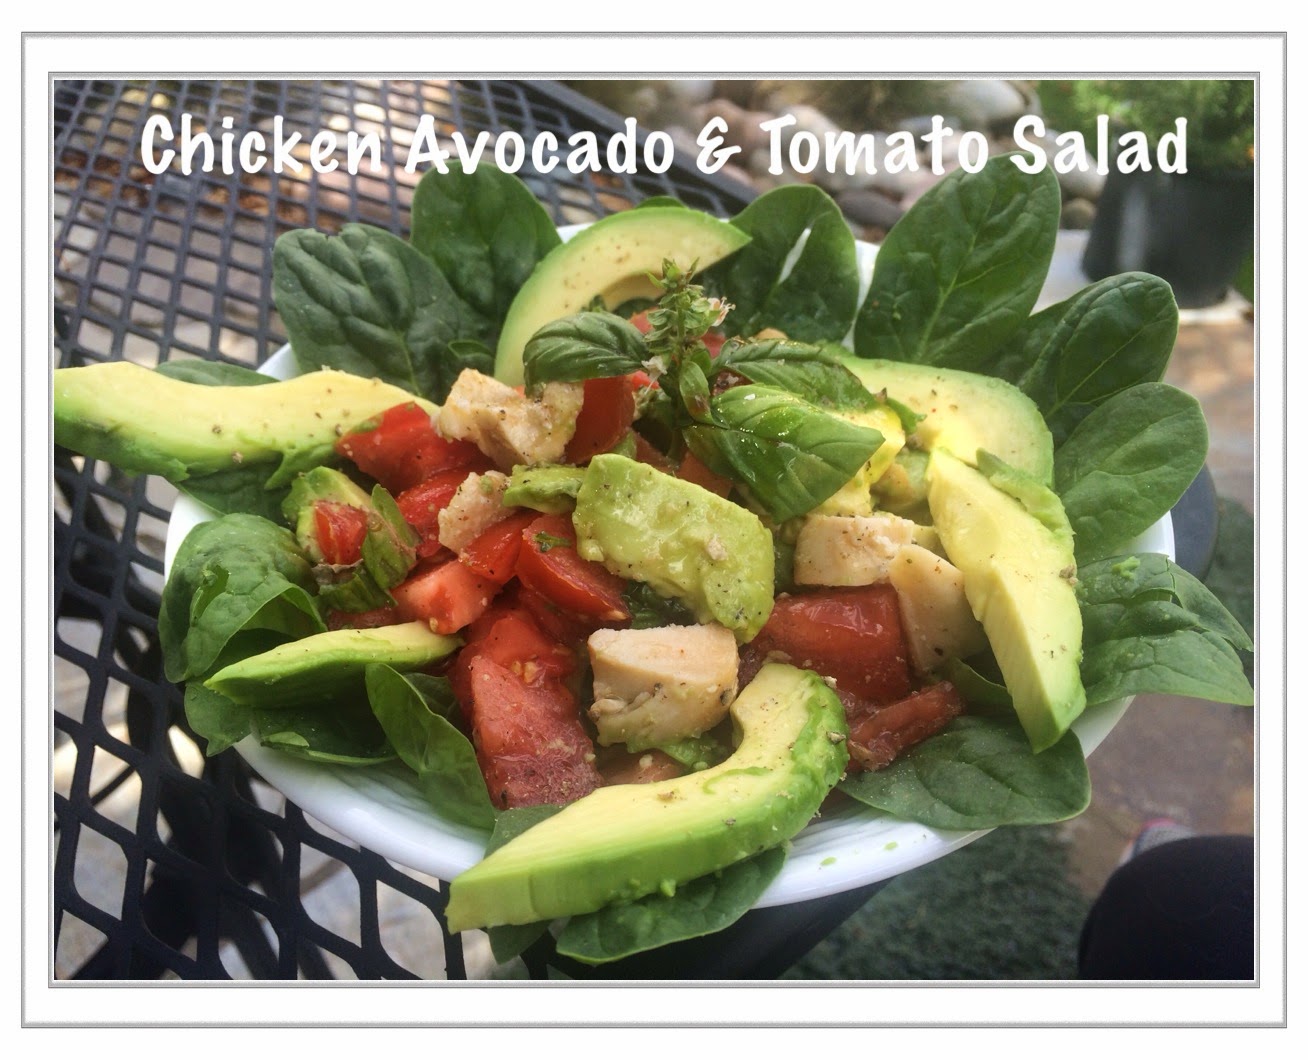
Chicken Avocado & Tomato Salad

Can you believe the end of summer is here?  I'm not sure why summer seems to go by so quickly, but it's a reminder to LOVE every minute of it when you're able to!  Today, I decided to make a quick lunch and just "BE" outside.  I REALLY DID nothing!  I just sat out on the front lawn with my dog and just soaked in the sun.  I'm sure in a month or two I'll look back on this day and and dream about how wonderful the grass felt and how amazing the sun (Vitamin D) felt on my skin.  Here is a tasty end of summer treat to use up those amazing tomatoes you have in the garden.  Keep DREAMING...WE ONLY LIVE ONCE!
Oh... and if you're one of my O blood type friends this is great except for the Avocado, but you can always have a few things on your avoid list every once in a while.

1 boneless chicken breast, sauteed on stove-top in a bit of olive oil, diced
1 ripe avocado, sliced
1 vine ripe tomato
1 bunch of fresh basil
1 handful of spinach leaves
Salt and Pepper to taste (Salt with Iodine)
3/4 tablespoons of olive oil
1 teaspoon balsamic Vinegar

Method

1)  Saute 1 boneless breast on stove-top in a bit of olive oil... I add Salt and Pepper. (I usually do a package of chicken a week and keep the breasts in the refrigerator for easy food preparation on quick meals, this way I can make the kids quick burritos, salads, sandwiches, pasta dishes...or whatever).
2) Place handful of spinach in a bowl
3) Add diced tomato
4) Add sliced avocado
5) Drizzle olive oil and balsamic vinegar over top, sprinkle salt and pepper to taste and GO SIT IN THE SUN with your yummy salad:)     
 

Thursday, September 25, 2014

Moss Filled Urns

What to do when your summer plants are dying and the urns are starting to look awful?  Well, sometimes I love putting fall plants in the Urn, like mums or a mixture of cabbages.  The trouble is they dye so darn fast I really don't like spending the money and have to change them out in a month or less.  These days most of use are looking for something that stays looking nice for awhile and doesn't dye within one month...who has time.  So here is something that has worked for me and I'm not running to the store to change it out every month.
Here is one of Urns
You can use a roll of moss, but my personal opinion is to find individual bags of moss, because you get more texture.
Use foam balls in the Urn and a glue gun to get the height you want.
Now you can see the texture of the moss I used.  It looks much better.


Here is one I made before moving 2 years ago and you can't tell its 2 years old.


This is another option for inside an urn

See the different heights you can go!

Monday, September 15, 2014

"ONE OF A KIND SIGN'S"...Decorative!

 Being a Swedish gal I decided that I wanted to put a few Decorative Sign's up around the house but, I didn't want them to just be the usual signs that you find at Hobby Lobby, or any other craft store.  I wanted them to really "MEAN" something to me.  So, I decided to find signs that were on major clearance and repaint them, making them "ONE OF A KIND"!
 My first sign I made, I took the wall paint color and painted over the existing discounted sign (I paid $5.00 for)!  I then took a little of the wall paint and mixed in a little white and black paint to streak it across the sign.  I then purchased Wood Letters and painted them red!  I glued them on the sign and VOILA... a sign that has meaning:)
SIGN #1
VOILA

This one Fit's PERFECTLY over the sliding glass door!

I like the three dimensional look this gives the sign...VERY CUSTOM!

Kinda hard to see in this picture because of the sun coming in the window!
 SIGN #2

The Next, sign I made I decided to GO BIG OR GO HOME...lol!  I purchased a $10.00 piece of wood from Home Depot.  In this one I decided to go a little more wild with the paint.  I first did a base coat using the wall paint again.  Then I took a damp paper towel and a little black paint and streaked that in.  Next, I took a crackle spray paint and sprayed the corners.  I let this dry.  Once dry, I sprayed some of the letters on the board and the others I used wood letters that I sprayed black outside, (These I glued on).  This sign is what my Grandmother used to say and I LOVE IT!  It reminds me of her.
This Sign puts a smile on my face:)

Here is a close up to see dimension!

On this Picture, I was trying to showing you the crackle paint!


HAVE FUN CREATING SOMETHING THAT IS YOU!


Save on select items at the Williams-Sonoma sale!

Clean up the kitchen with...Bar Keeper's Friend...click below!